
Paneer Tikka is a popular Indian appetizer that’s loved for its smoky, flavorful, and juicy taste. Traditionally cooked on skewers in a tandoor, it’s now easy to make at home using your oven, grill, or stovetop. Whether you’re craving a healthy snack or looking for a tasty party appetizer, here’s how you can whip up this dish with ease.
Ingredients Required
To make delicious Paneer Tikka, gather the following ingredients:
- Paneer (Cottage Cheese): 250g (firm and fresh)
- Yogurt: ½ cup (thick and hung yogurt works best)
- Ginger-Garlic Paste: 1 tablespoon
- Lemon Juice: 1 tablespoon
- Red Chili Powder: 1 tablespoon
- Turmeric Powder: ½ teaspoon
- Garam Masala: ½ teaspoon
- Cumin Powder: ½ teaspoon
- Coriander Powder: 1 teaspoon
- Kasuri Methi (Dried Fenugreek Leaves): 1 tablespoon (optional but recommended)
- Salt: To taste
- Oil: 1 tablespoon (for grilling)
- Chopped Coriander Leaves: For garnish
- Bell Peppers & Onions: Optional, for skewering and grilling with the paneer
Tips for Best Results:
- Use Fresh Paneer: Fresh paneer absorbs the marinade better, resulting in a juicy texture.
- Thick Yogurt: Straining the yogurt ensures a thick consistency, helping the marinade stick to the paneer cubes.
The Marinade:
The key to a great Paneer Tikka is the marinade. Follow these steps to make a flavorful, creamy marinade:
- Prepare the Yogurt Mixture: In a mixing bowl, combine the thick yogurt with ginger-garlic paste, lemon juice, red chili powder, turmeric, garam masala, cumin powder, coriander powder, and kasuri methi.
- Mix Well: Whisk everything together to create a smooth, thick paste. Add salt according to your taste preferences.
- Marinate the Paneer: Cut the paneer into cubes (or strips) and add it to the marinade. Make sure each piece is well-coated. For best results, cover the bowl and let the paneer marinate in the fridge for at least 30 minutes (you can leave it for up to 2 hours for more intense flavor).
Cooking Methods:
Now that your paneer is marinated and ready to go, let’s explore three easy ways to cook it.
1. Grilling the Paneer Tikka (Best Option)
Grilling gives paneer tikka the signature smoky flavor that elevates the dish. Here’s how:
- Preheat your grill to medium-high heat.
- Thread the marinated paneer cubes onto skewers (alternating with onion and bell pepper pieces, if desired).
- Brush a bit of oil on the paneer and grill for 10-12 minutes, turning every 3-4 minutes until the paneer is golden-brown and slightly charred.
- Once done, remove from the skewers and serve hot with a sprinkle of lemon juice and chopped coriander.
2. Baking in the Oven (Easy and Quick)
If you don’t have a grill, the oven works wonders:
- Preheat your oven to 200°C (392°F) and line a baking tray with parchment paper.
- Place the skewers or arrange the paneer cubes on the tray. Brush with a bit of oil or ghee to help it crisp up.
- Bake for 15-20 minutes, flipping halfway through. Once the edges turn golden, take them out.
- Garnish and serve!
3. Stovetop (Perfect for Quick Cooking)
Don’t have an oven or grill? No worries! You can make Paneer Tikka right on the stovetop:
- Heat a non-stick pan or skillet over medium heat and brush with some oil.
- Place the marinated paneer pieces on the pan and cook for 5-7 minutes per side, or until golden brown and crispy.
- Ensure not to overcrowd the pan to get that perfect sear.
Serving Suggestions
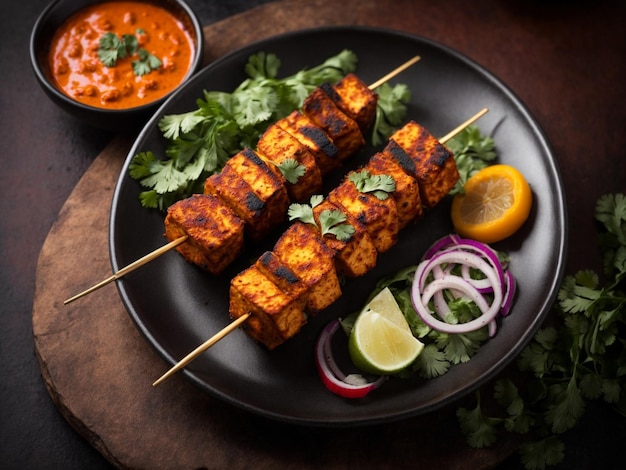
Paneer Tikka is best served immediately after cooking while it’s hot and smoky. Garnish with fresh lemon wedges, chopped cilantro, and a sprinkle of chaat masala for extra zing.
You can serve it alongside:
- Mint chutney: A refreshing dip made of fresh mint, coriander, lemon, and spices.
- Onion Salad: Thinly sliced onions with a dash of lemon juice and black salt for a crunchy side.
- Naan or Roti: To enjoy the tikka as a light meal or snack.
Paneer Tikka is a simple yet delightful dish that brings the essence of Indian cuisine into your home kitchen. Whether you bake, grill, or cook it on the stove, the combination of flavors and textures will surely impress your family and guests. So, go ahead, give it a try, and enjoy a delicious homemade treat!